I’m kicking off a series of “why I love OneNote posts because … I ran into a feature I didn’t even KNOW about and got really excited. To be clear, this will be a highly incomplete, potentially ever-growing list of reasons. And – as more articles are written on the topic, I’ll add a link to each of them so you can easily browse between them (#WordpressReusableBlocks FTW).
But why? Why do I sing the praises of the OneNote Desktop App? Because it’s AMAZING. I’ve been using it for over 10 years. Co-authoring my notes with colleagues. Organizing work and personal thoughts. Documenting future blog articles I’ll probably never write. Planning presentations. It’s a FANTASTIC tool. I remember when David Berry and I (or was it just David? oooh, the memory ain’t what it used to be) did a presentation for the Booz Allen Executive Assistants team on using OneNote – it was such simple stuff to those who know the tool, and yet, it’s a life changing application.
So, here’s a few of the reasons why I love it. Not the Windows App – that thing is a light-weight version with none of the bells and whistles I love. Maybe some of the features below exist, but … I’m just not there right now.
Setting the Table
Did you know you could build tables in OneNote? It’s actually fairly straightforward. Now, Tables aren’t particularly strong in OneNote, but this is a note-taking program, not a project management tool.
There are times, though, when taking notes in a structured manner fits best. So, how do you do it?
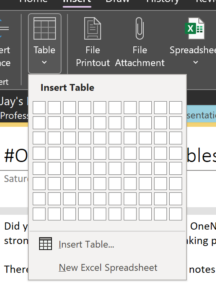
From the ribbon, inserting a table is as easy as that. Insert > Table > Select your size. From there, take your structured notes, store your structured data, and OneNote away!
But the thing about taking notes in a program like OneNote is sometimes you don’t know what you need. If you’re like me, you take raw notes. As people talk. Almost verbatim, sometimes. And that leads to poorly structured information. But when someone starts to speak in structure it can be very nice to know some tips.
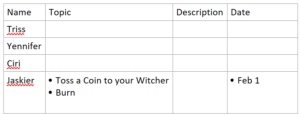
For example, if your boss says they need to capture specific information from specific people, we have a reason for a table. What information, you ask? And of course, she answers: Get their name, topic they’d like to talk about, a description, and the date they can be ready. Start with Triss, Yennifer, Ciri, and Jaskier.
So, how did I create this table? Sure, the method above would work – select a table 4 columns by 4 rows, then start to fill it in. Oh! Dang it, I meant 5 rows. How do I edit a table again? Sure, I know it’s possible. Right click, select … shoot, what’d the boss just say?
Help for the Keyboard Junkie
There’s an easier way in OneNote. It’s actually pretty slick. Just. Hit. Tab. To create the above table I jumped to a new line and simply stated typing:
Name TAB Topic TAB Description TAB Date ENTER Triss TAB TAB TAB Yennifer TAB TAB TAB Ciri TAB TAB TAB Jaskier.
At the end of a plain text line the TAB key creates a new column. Type some more text, press TAB again, new column. Keep going until you’ve hit the number of columns you know about. Then you’re done. Ready for a new row?
At the end of the word “Date” … Simply, Press. Enter.
We now have a table. 4 columns wide – from now on TAB at the end of the text of a cell you move to the next cell. In the last cell in a row you get a new row. Neat stuff. Easy peasy. We call these keyboard shortcuts … welcome to the club.
A couple Remaining Tricks
Sometimes you need a second line in your table, especially when you’re taking raw notes. I do this all the time. It’s easy – just hit ENTER. Except, in the last cell of the last row. If you hit enter there you create a new row (just like we learned between the words “Date” and “Triss”.
In this row, SHIFT+ENTER will get you what you want.
Then there are lists – within your cells. You see, Jaskier is a bard, he likes to sing. Perhaps you’ve heard of Burn, or Toss a Coin to your Witcher? He’d like to speak about them and you need to track these as lists. A simple trick within OneNote works within the cell here. ASTERISK > SPACE. One, followed by the other, automatically creates a list item.
After “Witcher” press ENTER and you get the second bullet for Burn. Again, super easy. Except, as you can see below, we get some funky behavior in that last cell of the last row again. Where you’d expect ENTER to create a new row, if you’re in a list, it simply creates a new list item. So you hit it again, and now, as you see below, you have the blank line that is the blue arrow. So you press ENTER AGAIN because surely now that you’re in a blank row it will go to a new row. Nope. Now you get the blank line that is the orange arrow.
This is funky. I gotta admit, this is something I wish worked differently. So what do you do? Hit TAB! Wait. No. It doesn’t work.
So here’s the deal with technology. Nothing ever works perfectly. It’s simply impossible for a developer to have thought of every single way someone will test their software. They try, they really do. I’ve been there. But they just can’t.
OK – don’t despair. It’s easy. A couple quick options.
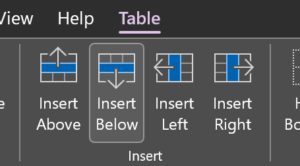
Option 1: when your cursor is in the table go to the ribbon and click “Table” – then click the Insert Below (or above, left, or right) option. Done
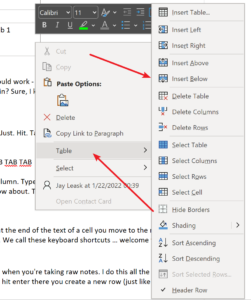
Option 2: right click within the cell, click Table, then “Insert Below”.
Note there are some other cool things worth catching your eye.
- Simple sorting, works by column.
- Shading, to help things stand out.
- Hide borders – you clever minx, hiding borders. Good luck with that when you can’t find your empty cells later on.
There’s more, but you get the idea.
You might need more
Like I said at the beginning of this, tables are NOT everything. This is a RAW NOTE TAKING TOOL. If you need more, use a purpose-driven app. Next up? Inserting a spreadsheet!


Pingback: February 2022 Role Call – Jay Leask